Notecards are digital sticky pads that you can add to a workspace. You can customize notecards by selecting a range of colors and inserting text such as action items, meeting feedback, and decisions; you can even use specific colors to distinguish among each.
You can adjust the workspace color schemes to emphasize the notecard border or frame. For example, while the notecard drop shadow is more visible in light mode, the rounded edges are more evident when using dark mode.
Learn more: How to Change the Background Color of a Workspace.
Adding notecards
- From the workspace toolbar, select
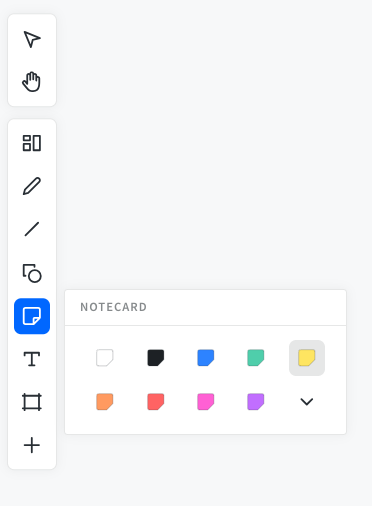
 (Notecard).
- From the Notecard modal, you can choose a preset color, or you can create a custom color. Either drag and drop your preferred notecard into the workspace, or select a color and continue to the next step.
- Hover the cursor over the preferred workspace area and click or tap the workspace background to insert the notecard. The notecard and associated Text toolbar appear.
Note: By default, the text appears left justified at the top left of your notecard.
- Type in the notecard to add text.
- The text editor toolbar allows for further text customization, such as font, font size, styling, alignment, bullets and numbers, text color, highlight, or adding a hyperlink.
- Select the ‘X’ or click outside the notecard to save your changes.

BluePro Tip: When you resize the notecard, the text size will automatically increase or decrease with the notecard’s size.
Quick add a notecard
For rapid notecard adding (and other shapes), you have several options. You can either drag and drop a notecard from the toolbar, or you can add it from an existing notecard using the following steps:
- Select Notecard.
- Place the notecard in your workspace.
- Add additional notecards to the left, right, or below by selecting the small blue dot on any side. A new notecard will immediately appear next to the original notecard.

Quick add notecards with right-click
- Without any object selected in your workspace, right-click using your mouse to open the shortcut menu.
- Select Add notecard.

Duplicate a notecard
- Select a notecard.
- Press CTRL+D (CMD+D for Mac) on your keyboard to duplicate another notecard or select
 (More) in the notecard toolbar and select Duplicate.

Customize a notecard
-
Use the Notecard toolbar to change the Shape, Colors, Card size, and Text.
-
Use the Text toolbar to change the Font Size, Style, Alignment, and Color. When you resize the notecard, the text size will automatically increase or decrease with the notecard’s size.
-
To apply changes, select outside the notecard.
-
If you have modified a notecard to have non-square aspect ratios, it can be snapped back to square by resizing either the width or height.


BluePro Tip: To quickly add or edit text on an individual notecard, double-click the notecard to enable text editing. When selecting one or multiple notecards, choosing the ![]() Edit text will open the Text Toolbar - a time-saver for consistent text formatting across a group selection.
Edit text will open the Text Toolbar - a time-saver for consistent text formatting across a group selection.
Notecard Toolbar

Expand to learn more about all options in the Notecard Toolbar.
| Icon | Description |
|---|---|
| Zoom to the selected notecard. | |
| Convert a notecard to another shape or card. | |
| Change text or fill of the notecard. Choose from the default colors or add a custom color. From the color palette, select the dropdown arrow, which opens a secondary color panel. Select the + symbol to access a custom color picker, where you can enter a hexadecimal (hex) code or use the slider to select a hue. | |
| Change the style of the text in the notecard. | |
| Change the font justification of the notecard. | |
| Add a bulleted list to the notecard. | |
| Highlight the text of the notecard. | |
| Add a link to the notecard. | |
| Locks the notecard to its current workspace location. | |
| React with an emoji on the notecard. | |
| Add and view comments on the notecard. | |
| View and select additional actions available based on the workspace object. |
The Text toolbar options allow you to edit specific text on the notecard.
Converting notecards into tasks
You can easily convert 1 or more notecards into Bluescape task cards to quickly move ideas to actions.
- Select the convert shape button from the notecard toolbar
- Select the Cards tab
- Select Bluescape task card

Copying spreadsheet cells into notecards
You can copy cell content from .xls/.xlsx or .csv files, then paste this content into images, text, or notecards. This is useful if you need to copy spreadsheet content as text quickly.
To copy and paste spreadsheet content to notecards:
- Open an Excel spreadsheet and highlight the preferred Excel cells.
- Use the keyboard shortcuts – Ctrl+C (Windows) or Command+C (Mac) – to copy the spreadsheet content.
- Open the destination workspace.
- Use the keyboard shortcuts – Ctrl+V (Windows) or Command+V (Mac) – to paste the spreadsheet content.
- Select Notecard from the dialogue modal that opens.

Paste spreadsheet content as notecard (after customization):

Paste spreadsheet content as an image:

Exporting notecards in different file types
You can group select multiple notecards and export them to different file types, including ZIP, PNG, PDF, and CSV files.
For example, to export notecards to a .csv file:
- Group select multiple notecards.
- Select (More) to access a flyout menu.
- From this menu, select Export. Select CSV
- A CSV file exports to your local machine with the text from each notecard displayed in a separate cell.
Related Questions
-
Can I attach a notecard to another object?
Yes, you can. Learn about Attaching Workspace Assets. -
Can I link my notecard to another object?
Yes. Learn about Linking Objects Together in a Workspace.
Ready to apply what you’ve learned? Go to Bluescape Home. ![]()